Sim Racing
The Racing Line: The Technique Your Sim Setup Can't Teach You
You've read the theory. You know about late apexes, geometric lines, and "slow in, fast out." Yet somehow, when you're wrestling with your wheel through Eau Rouge or trying to nail the Corkscrew at Laguna Seca, something feels... off. The car doesn't respond like the tutorials suggest it should. Your lap times plateau despite following all the "correct" advice.
June 18, 2025
Here's the truth: In sim racing, we're missing a lot of the crucial sensory information that real drivers take for granted. But there's good news - once you understand what's actually happening in a turn, you can use telemetry and specific techniques to bridge that gap.
The Fundamentals Explained Simply
The racing line is the path through a corner that results in the fastest lap time. Not the shortest distance, not the prettiest arc - the fastest time. Think of it like this: if you had to roll a marble through a curved pipe as quickly as possible, you'd bank it high on the outside before letting it drop through the curve, using gravity and momentum to slingshot out the other side.
Your car works similarly, except instead of gravity, you're managing grip - a finite and variable resource that your tyres distribute effort between turning, braking, and accelerating. The trick is spending it wisely. You can only have so much braking if you’re turning, for example - a lesson on trail braking coming very soon.
Here's why that classic "late apex" approach works: by turning in later and hitting the apex (the innermost point of your line) further around the corner, you create a straighter exit. A straighter exit means you can get on the throttle earlier and harder, carrying that extra speed all the way down the following straight. You’ll have seen this in action - getting a good exit gives you that wonderful green delta all the way down the straight.
In a 60mph hairpin leading to a half-mile straight, gaining just 2mph on the exit translates to roughly 0.15 seconds saved by the next braking zone. Multiply that by 15 corners per lap, and you're looking at over 2 seconds - often the difference between hero and zero.
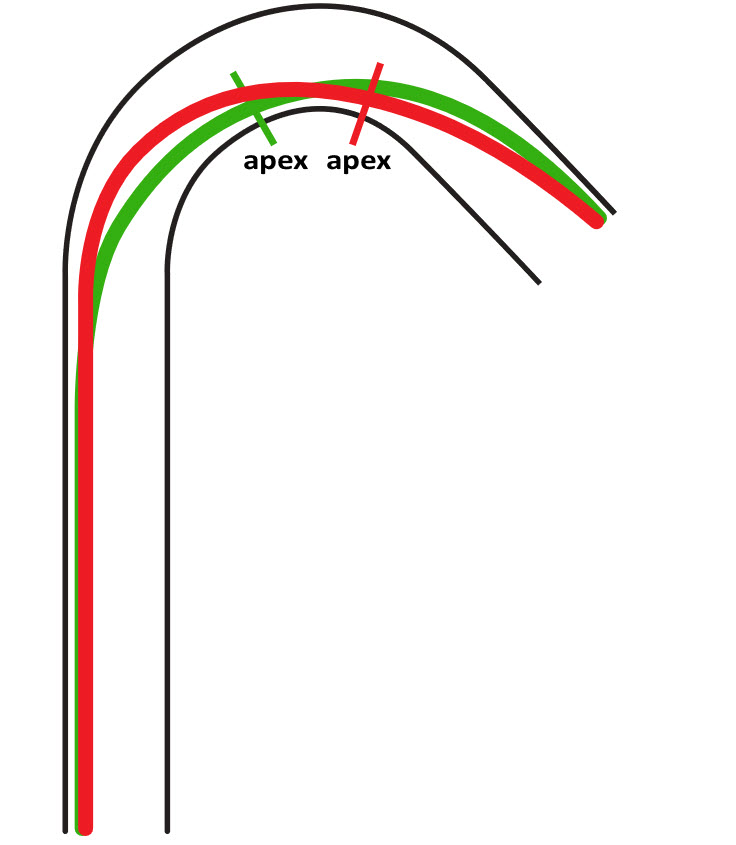
The geometric line (green) might look smooth, but the ideal racing line (red) trades mid-corner speed for a better exit.
How to Recognise the Optimal Line in Your Sim
This is where sim racing diverges from reality. Without g-forces pushing you into your seat, you need to become fluent in reading three key indicators:
1. Force Feedback Translation
Your wheel is trying to tell you a story, but it's speaking in its own special language. Here's the translation:
- Light, responsive steering = You're within the grip circle, tyres are happy
- Steering goes heavy and resistant = Front tyres are starting to slip (understeer)
- Sudden lightness or 'release' = Rear stepping out or front tyres fully sliding
- Oscillation or sawing = You're right on the limit (this is good!)
The optimal racing line should feel like you're constantly working with that heavy steering feel on entry, adjusting to manage entry oversteer, then progressively lightening through the exit as you unwind lock and increase power.
2. Visual Anchor Points
Real drivers use peripheral vision and depth perception that flat screens can't replicate. Compensate by establishing three visual anchors for every corner:
- Brake marker: A trackside object where you begin braking - if there’s no marker do this by feel
- Turn-in reference (red): Often a change in track surface or curbing
- Apex target (blue): The specific point where you want to clip the inside
- Exit marker (green, far right): Where you should be looking using your vision for the exit
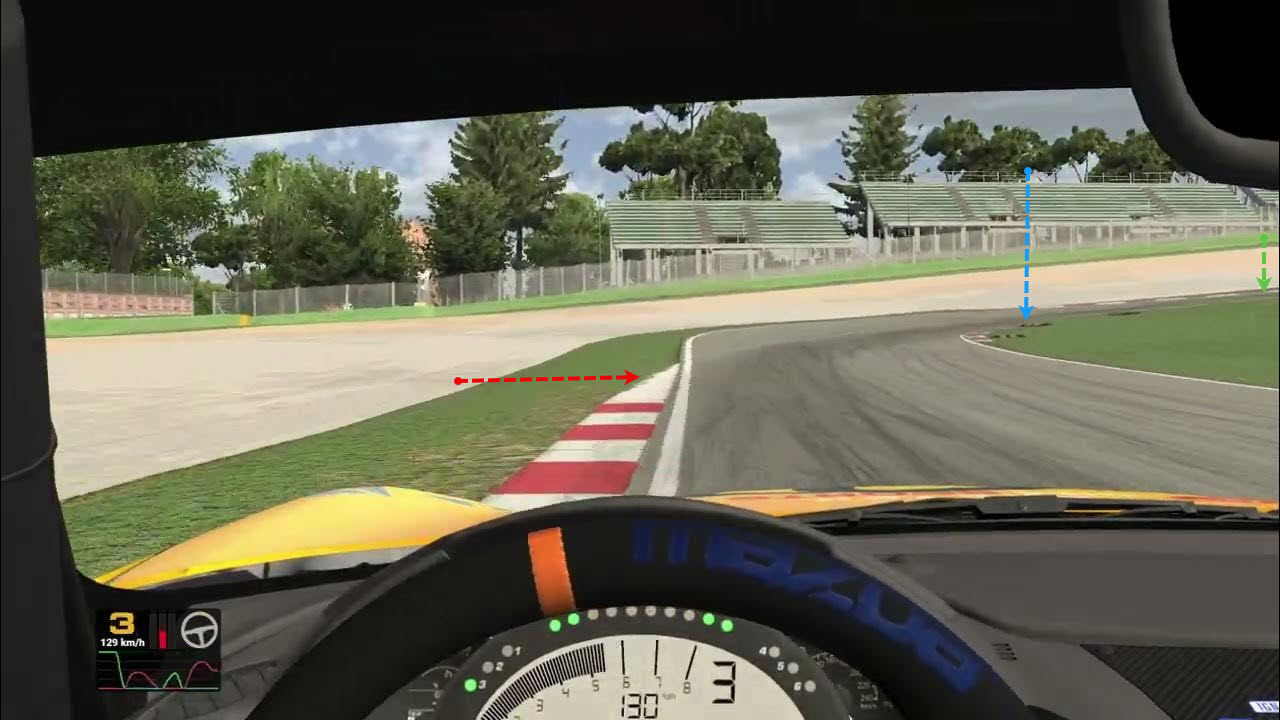
Pro tip: Use replay cameras to analyse your driving and find references that might work
What looks right in chase cam might be completely wrong from cockpit view.
The key reference points: Your racing line is defined by where you brake, turn in, clip the apex, and track out
3. Audio Cues Most Drivers Miss
Tyre scrub sounds tell you more than any amount of visual information:
- Consistent "whisper" = Tyres working at 95-98% (perfect)
- Sharp squealing = Over the limit, you're sliding
- No sound at all = You're leaving performance on the table
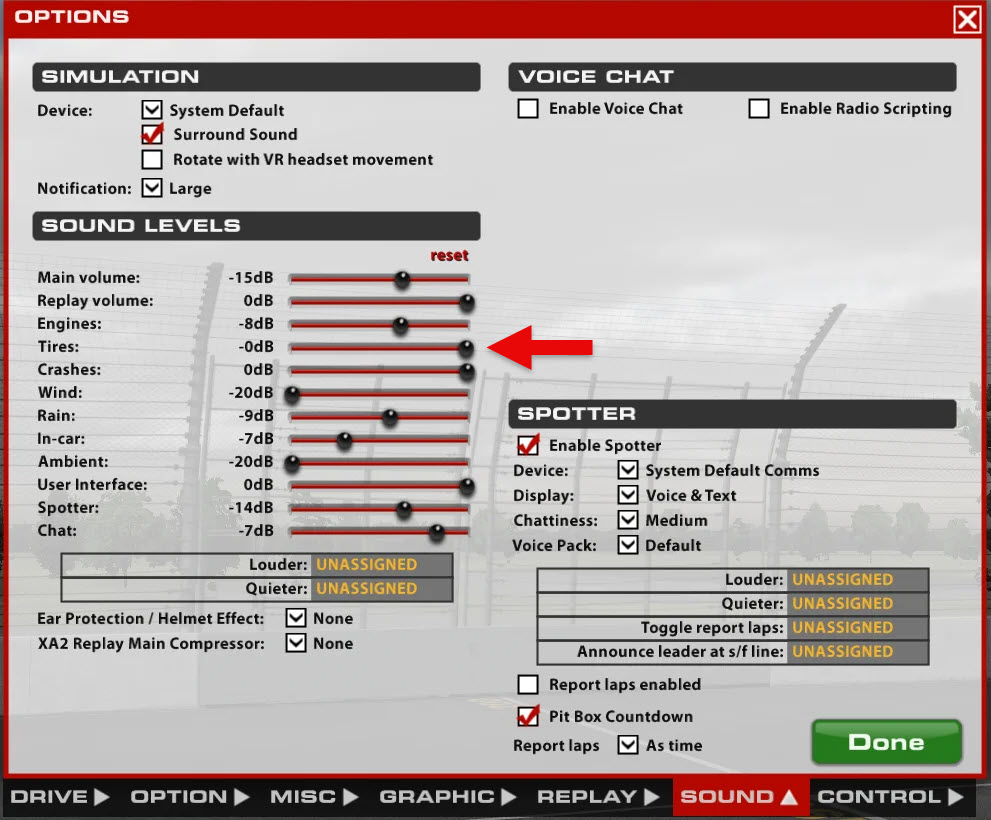
The iRacing’s audio settings - use “Tires” to increase the volume of your tyre noise - there’s a vast amount of information available to you here
The Four-Phase Technique
Rather than thinking of corners as single events, break them into four distinct phases. Master each phase individually before linking them:
Phase 1: The Setup (Straight-line braking)
Goal: Shed speed efficiently while keeping the car balanced
Specific technique:
- Brake at maximum pressure initially
- Hold maximum pressure for 0.5-1.0 seconds
- Begin gradual release as you approach turn-in
- Keep 10-15% brake pressure as you turn in (trail braking)
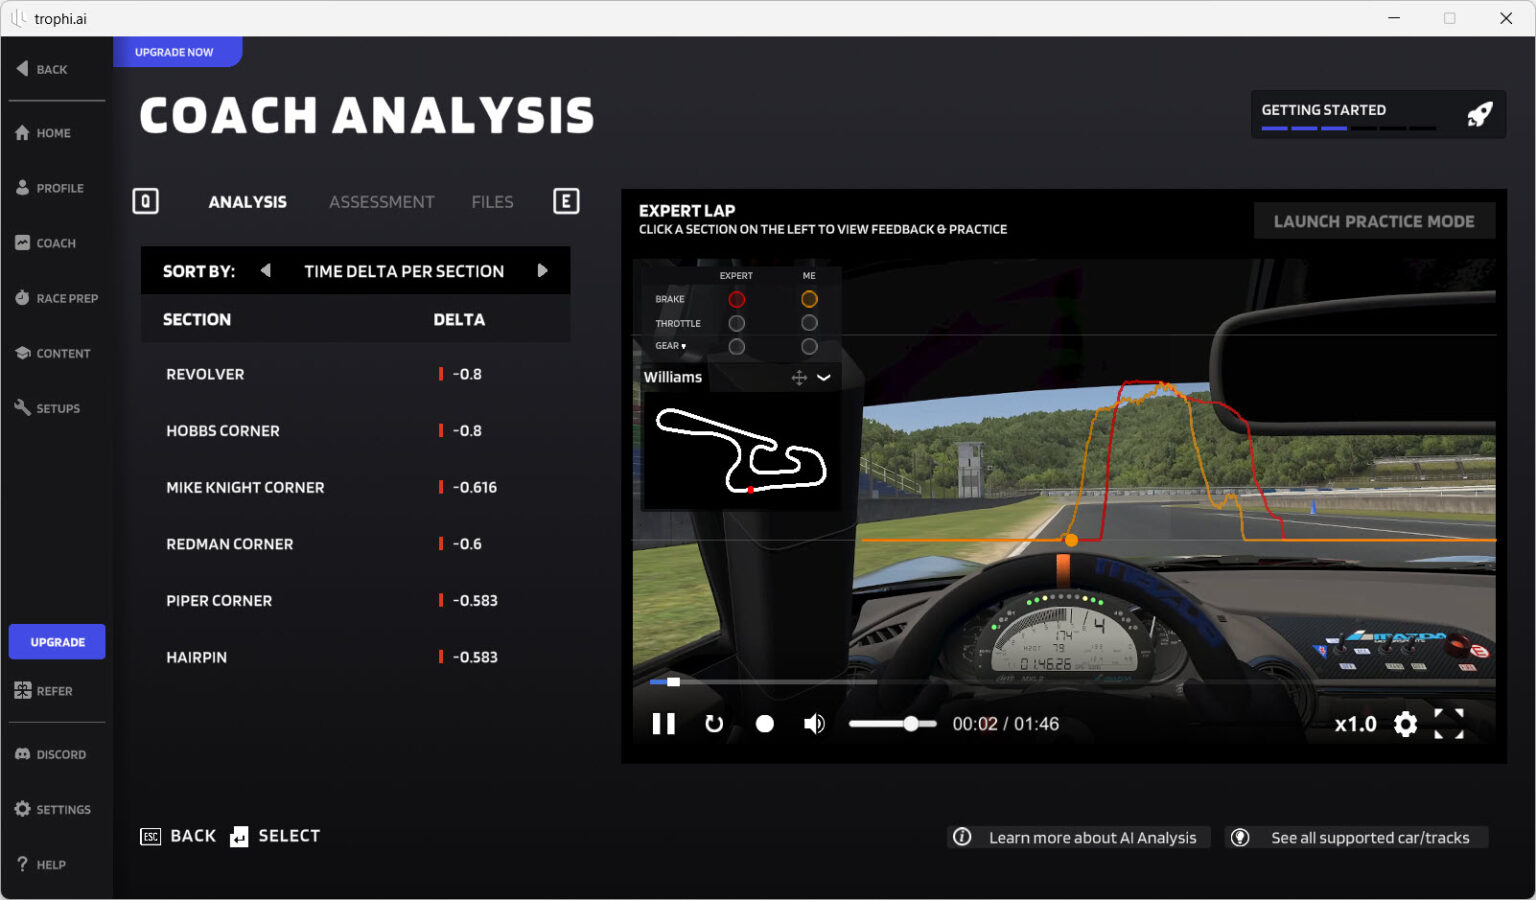
Student (orange line) vs Pro (red line) - note the initial braking force, followed by the gradual reduction in brake pressure over time.
Telemetry markers:
- Peak deceleration: -1.2 to -1.5 G (depending on car/sim)
- Brake pressure: Clean spike to 100%, smooth taper
- Speed decrease: Linear until trail brake phase
Phase 2: The Rotation (Turn-in to apex)
Goal: Point the car toward corner exit while maintaining momentum
Specific technique:
- Turn steering smoothly but decisively (no jabbing)
- Feel for the steering to weight up slightly
- Continue trail braking until car rotates to your desired angle
- Completely release brakes just before apex
Telemetry markers:
- Steering angle: Smooth increase to peak at/just before apex
- Lateral G: Building progressively to peak at apex
- Speed: Minimum speed occurs AT apex, not before
Phase 3: The Transition (Apex moment)
Goal: Switch from deceleration to acceleration seamlessly
Specific technique:
- Eyes already looking at corner exit
- Begin throttle application BEFORE reaching minimum speed
- Initially apply 5-10% throttle to stabilise platform
- Progressively increase as steering unwinds
Telemetry markers:
- Throttle trace: Never fully closed at apex - always 5%+
- Speed trace: V-shaped bottom, not U-shaped
- Steering angle: Beginning to decrease
Phase 4: The Launch (Apex to track out)
Goal: Maximize acceleration while using all available track
Specific technique:
- Unwind steering in direct proportion to throttle application
- Let the car drift wide naturally - don't hold it tight
- Use ALL the track width on exit (crucial!)
- Straighten wheel completely before 100% throttle
Telemetry markers:
- Throttle: Progressive ramp to 100%
- Lateral G: Decreasing as longitudinal G increases
- Track position: Within 50cm of track edge on exit
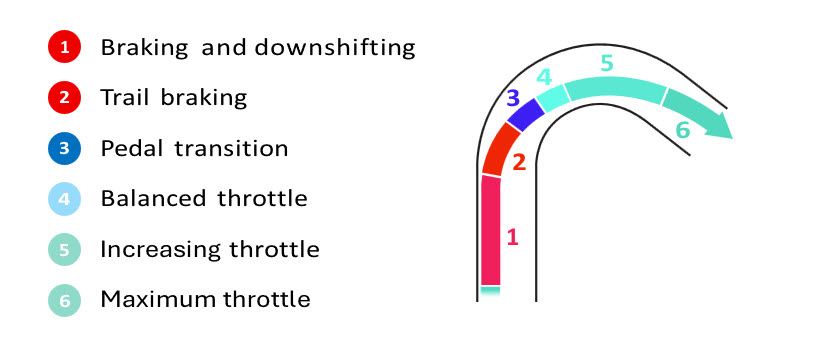
The six phases of cornering: Our four-phase technique combines phases 1-2 (Setup), keeps phase 3 (Rotation), phase 4 (Transition), and combines phases 5-6 (Launch)
Your 15-Minute Daily Practice Drill
Pick one corner at your favourite track. Just one. Here's your progression:
Week 1: Consistency First
Run 20 laps focusing solely on hitting the same brake marker every time. Don't worry about being fast - aim for identical brake application points within a car length. Success metric: 80% of brake applications within 1 metre.
Week 2: Entry Speed Calibration
Using your now-consistent brake point, adjust your turn-in point earlier and later by half a car length. Note which gives better minimum speed through the corner. Success metric: Find the turn-in that gives highest minimum speed.
Week 3: Exit Optimisation
Keep your perfected entry, now experiment with apex points. Try early, geometric, and late apexes. Measure your speed at the exit point of the corner. Success metric: Identify apex that gives highest exit speed.
Week 4: Full Integration
Combine all elements. Focus on the smoothness of your inputs. Your hands and feet should move like you're conducting an orchestra, not playing whack-a-mole. Success metric: Complete the corner with no abrupt input changes.
Troubleshooting Guide
"I'm hitting all the marks but I'm still slow"
- Check your minimum speed - it's probably too low
- Verify you're using ALL the track on exit
- Your "smooth" inputs might actually be too slow - quicken transitions
"The car won't turn in where I want"
- You're likely entering too fast - brake 5m earlier
- Not trail braking enough - keep 10% brake pressure longer
- Cold tyres - ensure proper warm-up
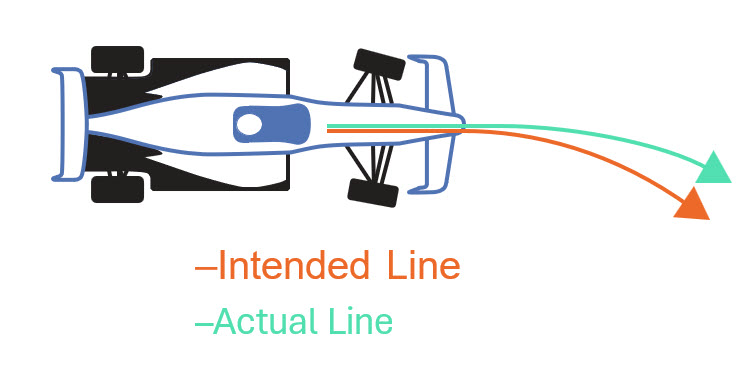
Understeer in action: When the car won't follow your intended line (orange), pushing wide to the actual path (green)
"I keep running wide on exit"
- Apexing too early - move apex point 1-2m later
- Applying throttle too aggressively - smoother initial application
- Not unwinding steering fast enough as you accelerate
"My FFB feels numb mid-corner"
- Normal! You're likely perfectly balanced
- Slight understeer gives more feedback - try 2mph faster entry
- Check FFB settings - you might need more dynamic range
Quick Reference Box
- Brake pressure: High initial (as hard as you can brake without a lockup) then smoothly trail off
- Minimum speed point: At apex, not after
- Throttle at apex: Never 0% - always 5-10% minimum
- Exit track usage: Within 50cm of edge or you're leaving time
- Steering smoothness: 1-2 seconds from straight to full lock
- Visual focus: Always one phase ahead of car position
- Tyre audio: Consistent whisper = perfect, excessive whisper with instability = over limit
Remember, the fastest line isn't about perfect theory - it's about maximising your specific combination of car, track conditions, and driving style. Use these techniques to find YOUR optimal line, not the one from a textbook. The telemetry doesn't lie, and neither does the stopwatch.
Happy racing!


